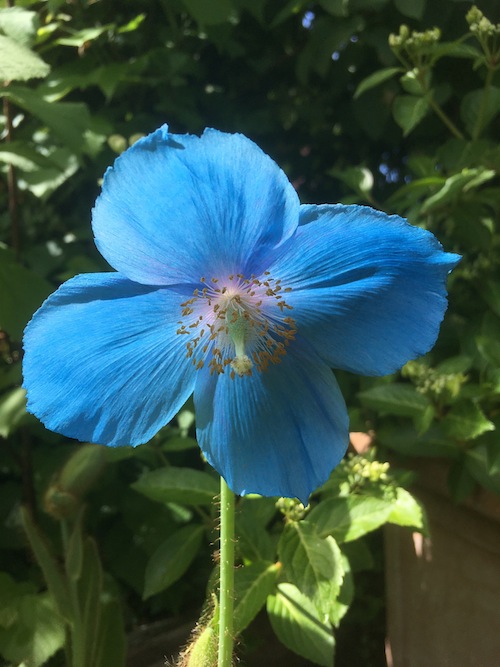
I’m lucky enough to have my Himalayan blue poppies in flower at the moment. I say ‘lucky’ as they are temperamental beauties with no guarantees. This year I’ve been honoured with a good show of flowers and a more buds on the way.

Meconopis, the blue Himalyan poppy, is a truly beautiful flower. I can’t think of any other plant that has such a exquisitely clear blue colour. True blue is quite an unusual colour in the natural world. I understand that many blue colours in nature are structural colours – so the colour is produced by the way light interacts with the surface structure, rather than from a pigment. Whether this accounts for its rarity or not, I don’t know.

Meconopsis have a somewhat deserved reputation for being difficult to both germinate and grow. They are fussy about their conditions and quickly turn up their toes if you haven’t got it right. They don’t like to be too dry, or get waterlogged, don’t like strong sunlight, deep shade or strong winds. They like a well-drained acidic soil with plenty of humus and leaf mould, but don’t like it too well drained and are vulnerable to slug damage. The best way to germinate them is to collect the seed but if you let them produce seed they might die from the effort of doing so. If you do get them to flower they are sometimes monocarpic so die after flowering anyway. A proper minefield!

It took me four years to properly get the hang of germination and here is my recipe for success. I was helped immensely by the advice from www.meconopsis.org plus a lot of trial and error (mostly error).
- You need fresh seed. The best thing to do is buy a flowering plant and wait for it to set seed to guarantee freshness. If you’re too impatient then try with seed from a good supplier. I have had some success with Plant World Seeds but not nearly as good as with fresh seed from a plant I bought at the Sheffield Botanical Gardens plant sale.
- Once you have your dry seedpod full of seed (about mid September) you need a seed tray or pot. Fill it with compost mixed with some sand and a handful of grit so you have a free draining mixture and cover with more grit. Sprinkle the seed on top of the grit and then water so the seeds sink down between the stones.
- Leave in a sheltered corner of the garden all winter. Don’t let the tray get waterlogged but don’t worry if it completely freezes solid either as this is an important part of the process.
- In spring your baby seedlings will start to come up. Wait until they are large enough to handle then prick out and pot on into a gritty compost.
- I keep mine in pots for a year as they are vulnerable to slugs and tend to disappear if planted out when too tiny. For potting on use a good mixture of compost, homemade compost, grit and leaf mould. It should be free draining but nutritious.
- Plant them out in dappled shade somewhere they won’t dry out. Mine like the area down the side of the house, which gets the morning sun but is shady and sheltered the rest of the day. Mulch with homemade compost and leaf mould and dig grit into the soil if you’re on clay. They prefer to be in the ground but I also have some in large pots which are watered frequently during dry spells.
- Protect from slugs and cross fingers!
- They should flower in their second year. Some plants are monocarpic and die after flowering, others short lived perennials, but this seems to be quite random.
2018 was the first year that I germinated from my own fresh, collected seed and I was astonished at the difference it made. The seed tray was like the magic porridge pot – the faster I pricked out the more new seedlings came up and I was nearly weeping trying to keep up but couldn’t bear to throw any away. By September 2018 I had 60 or so young plants with no space to plant them out and limited time to look after them.

Fortunately Sheffield has its own pseudo Himalayan paradise, Whinfell Quarry Garden. This is a Himalayan style garden constructed in a Victorian quarry a couple of miles away. There are redwoods and acers, rhodedendrons and gunnera, with dappled sunlight and leaf mould and I thought how much the conditions would suit them. The garden is looked after by the Friends of Whinfell quarry gardens and the very nice chairman agreed to adopt some of my meconopsis to plant there. It was very exciting waving them off to their new home!
The remaining ones seem to be doing ‘OK’. Not bursting with health, but ticking along. No matter how much we look after the soil and try and get the sun and shade and watering just right, what we can’t change is the air. Even at 800 feet in Sheffield I can’t give them the Himalayan clouds and moist air that they would have in their natural conditions. This is why they do best on the mild, drizzly west coast, with impressive displays in the gardens of Ireland, the Lake District and the west coast of Scotland.

Despite all this I would encourage anyone to give them a go as they are a heart stopping plant to have in your garden, and you can be extra proud if they are raised yourself from seed.

One thought on “Growing Meconopsis from seed”